The previous lesson demonstrated how to load music and animated graphics via an external html file. This lesson shows how to load music and graphics directly into a div tag with no need to create additional html files. Once everything is loaded, the div tag itself is animated.
1. Download twistagain.zip from free.mynmi.net, copy the unzipped folder into your mysite folder, and open juke.html with your browser.
2. As you can see, juke.html contains pictures of famous musicians. Click on the picture of Chubby Checker to load a song about twisting that used to be very famous and still sounds pretty good. Not only did the song play, but a big picture of Chubby Checker should also have loaded, moved around, and ultimately have faded away.
3. Open juke.html with brackets and look at the CSS style associated with #result. Notice that the display is set to none (display: none;). This means that the div tag is invisible. You will soon be loading music and graphics into this div tag, making it fade in as it becomes visible, moving it around and then fading it back out to invisibility! I promise.
4. Find the chubby.jpg and you should see the code below:
<img src="small/chubby.jpg" onclick= " song(); moveit(5,5)";>
Focus on the code that appears after onclick=, which is calling two functions: song and moveit.
5. Let’s look at the first function named song. Open anim.js, the javascript file that contains the function.
6. Near the top of anim.js you should see the code block shown below. The first portion of the code, $(‘#result’).html, tells the function to target the div tag with #result ID that we looked at earlier, and to load whatever follows into it’s html. The next portion, starting with <audio and ending with </audio>, adds the html tags to insert an audio player and mp3 file named twist.mp3 into #result. The second portion loads an image named chubby.jpg.
 7. You have a function that loads a specific song and graphic but we want a reusable function that can easily load more than one song and one image. We could, of course, take a heavy handed approach and simply copy and paste the song function three times, and rename and modify each one to call new sound and image files, but we’re not like that. We will take a more elegant approach, using something called arguments that will allow us to add variables to functions as we call them. With properly implemented arguments, we can instruct the song function to load a different sound and image every time we use it. So let’s do it!
8. While still in anim.js, change function song() to read function song(musicfile). In this case, the word musicfile becomes what is known as an argument. Now take a look at the portion of the song() function that calls the actual music file:
<source src=\"twist.mp3\" type=\"audio/mpeg\" />
Replace \”twist.mp3\” with the word musicfile and add + before and afterward (In javascript the + symbol is used to combine text strings with variables). Now add one quotation mark after src= and one before type=. Lastly, add one space between the quotation mark and type=. Get all that? If not, here is how everything should look when you finish:
<audio autoplay=\"true\"><source src=" + musicfile + " type=\"audio/mpeg\" />
9. As you can see, twist.mp3 has been replaced with the variable musicfile that matches the argument that you just added. Now return to juke.html and, once again, find chubby.jpg. Change song() to read: song(‘twist.mp3’). Now test it. If you did everything correctly, the music should play.
10. Before we start calling more songs, lets add an argument to call graphics. Return to anim.js and change function song(musicfile) to read: function song(musicfile, picfile). Next, change <img src=\”chubby.jpg\”>” to <img src=”+picfile+”>”.
Return to juke.html and change song(‘twist.mp3’) to song(‘twist.mp3′,’chubby.jpg’) . Test again. Hopefully you hear music and see Chubby Checker’s picture.
11. At this point you have a function that is reusable. Find aerosmith.jpg and call the same function but copying, pasting, and modifying the code from chubby.jpg to call Aerosmith’s music and graphics as in:
onclick= " song('twist.mp3','chubby.jpg');   turns into
onclick= " song('walkthisway.mp3','aerosmith640.jpg');
13. Test the link. If you did everything properly, you should hear and see Aerosmith. Whoopee….
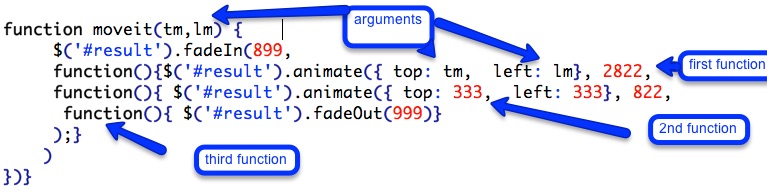
14. By now you probably have noticed that the link that calls the song function on chubby.jpg also calls another function named moveit which has a couple of arguments in parenthesis as in moveit(5,5). Those two numbers pass coordinates to the function about how to animate the #result div tag. In this case, you are instructing the div tag to keep moving until it arrives at a location that is 5 pixels from the top and left side of the browser window.
15. Return to anim.js and look at the function named moveit. Like song1, moveit is what is known as a “named function”, which simply means that you have to invoke the name of the function somewhere in your html code in order for it to operate. The first portion of moveit tells #result [footnote] remember, #result is invisible [/footnote] To fade in and become visible over a period of 899 milliseconds. Moveit also contains three additional “anonymous functions” [footnote] You don’t have to call them, they do their work automatically. [/footnote] that are set up to activate sequentially. When one function finishes the next one starts.
16. After #result fades in, the first function animates to wherever you told it to in the arguments. Remember moveit(5,5)? Those arguments tell tell the function to move it from wherever it currently is located to 5 pixels from the top and left side of your document over a period of 2822 milliseconds. The second function animates it to 333 pixels from top and left in 822 milliseconds. Finally, the third function fades it out over 999 milliseconds. There is nothing sacred about these numbers by the way, if you change them you can speed up or slow down the animations.
17. The scary and definitely the most difficult aspect of this function comes from those brackets and parentheses. Functions are very particular about these things and they have to be in exactly the right place and order. Named functions like moveit always have the same basic form. They start with the word function followed by the name and parentheses and opening and closing brackets: as in function moveit(arguments) { actions }. If arguments exist, they are placed within the parentheses and separated by commas. Whatever the function is supposed to do, ie. the actions, take place between the { } brackets. Anonymous functions have no name or arguments.
18. Now link both functions to the remaining images. Use the link on Chubby Checker as a model to call the two functions and load the appropriate songs and graphics. Keep in mind that you can modify the moveit animation (somewhat) by entering different numbers for each instance that you link to.
19. Now that everything is functioning you may have noticed that one on thing is missing. Other than the graphics and music, there is no information about the musicians or their songs. Fortunately, there is an easy remedy: another argument. Return to the song function within anim.js and add the word title to the other arguments as in: function song(musicfile,picfile,title).
20. Now insert title into the html code of the function as shown below.
![]()
21. Final step: Return to the main document and modify the links where you call each song to include information. Be sure and use single quotes and feel free to add formatting information as in:
onclick= "song('twist.mp3','chubby.jpg','<h2>Chubby Checker: Twist</h2>')
22. Test again. This time your information should appear along with the graphics.
Next: Eyecatcher