Now that WordPress is installed on your site you have the power to modify literally anything you want to in your WordPress site. Of course power without knowledge is a dangerous thing so let’s work on plugging that gap.
Basic Blogging
As you can see, the Dashboard offers lots of options. We will start our exploration of those options with “Posts,” “Pages,” and “Appearance.”

Let’s start with a simple blog post. Click on “Posts” on the left navigation bar. The page that comes up is the list of all your posts, and there should be a default, “Hello World”, post already active. Hover over the Hello World post and notice that a couple of options show up. Push “Trash.” Now click the “Add New” button to the right of the “Edit Posts” header.
Once the page loads, nice that there are two main sections: Title and Content (shown below).
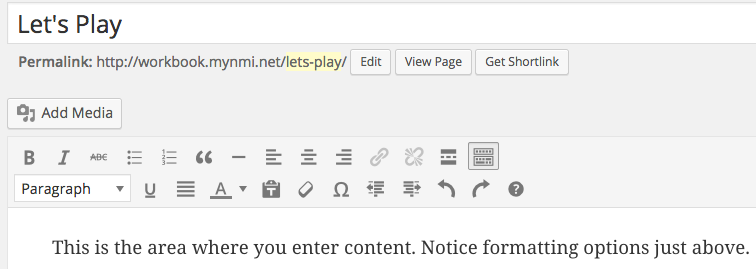
Take note as well, of the icons that can be used for uploading media and formatting content.
Go ahead and fill out the Title and Blog sections with some sort of information. The Excerpt section is optional. Once done, on the top-right side of the screen, you will notice a blue publish button. Click it to make your post available to the world.
Congratulations! You have published your first blog post on WordPress. Once the publishing process is finished, a yellow bar will appear above the Title section that lets you view your post. Click “View Post” to see it.
Categories
Now that we have been able to make a blog post, we need to add some categories to it. These help with allowing your reader to understand the main topics of your post. Later on, when you have a lot of blog posts, visitors to your site will be able to view all of the entries that are associated with a given category. For instance, say your blog is about college sports and the new post for the day talks about the new quarterback. A couple of categories that you may add to this post could include: “The name of your college,” “Football,” and “Varsity Sports.” By just looking at those category tags, one could easily infer the main topic of the post.
Time to add categories of your own. Click the “Posts” button to see the drop down menu and then click Categories. Here is where you can manage all of your category tags. Type in the Category Name and Description in their appropriately labeled boxes and click “Add Category” at the bottom of the page. Add as many categories as you would like.

As you add more categories, notice how the list updates itself on the right side to show all of the categories that you have created thus-far. It also shows how many posts you have under each category for you to take inventory later.
Once you have a couple of categories, make your way back to your first blog post by clicking Posts again on the left navigation. Hover over your first post and notice the four links that pop up: Edit, Quick Edit, Trash, and View. Click “Edit” so we can add our categories to the post.
On the right hand side, you’ll see the “Categories” panel with an updated list of all the new categories you created. You can check/uncheck as many as you would like to categorize your post with. Once you are done, click “Update,” and wait till the yellow box appears and click “View Post.” You’ll see that at the bottom of your post, all of your categories will appear.
Changing Appearance Or Theme
At this point your blog is using the default theme that WordPress chose for it and it may not be exactly what you want. Don’t worry, there are thousands and thousands of themes to choose from and there are also ways to tweak the appearance and function of themes once you find one that you like.
On the left navigation click “Appearance” (it’s near the bottom). You should see a theme or two, including the one that you are using. Just for fun, let’s install a new random theme from the Internet. Click the Install Themes button and then clicked “Featured”.

You should see snapshots of a few themes. Click “Newest” to see several more. Pick one and install and activate it. [footnote] note, you may have to enter your FTP credentials; ie. username and password.[/footnote]
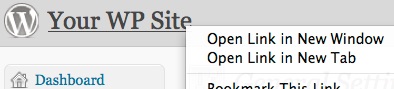
Once the theme is successfully installed, right-click on the name of your site [footnote] in the upper left corner right next to the big W, and Open Link in new tab.[/footnote]
This will open the published version of your site. Any time you use the Dashboard to change your site, you may can return to this tab and click to refresh button to see how it affects your site.
As you can see, it is ridiculously easy to radically change the look of your site with a new theme. The biggest problem with pre-made themes, however, is that they may have features that you want to change. You may find a theme that you really like but you also may want a different font, or you may want some pages to have a side-bar but prefer that other pages don’t. Etc. In that case, if you are brave and stalwart, one option is to HACK THAT THEME. In a later section we will learn how to do just that.
Adding Widgets to Your Template
Most templates offer the option of adding pre-made widgets to your site. These may be things like: Flickr, so you can show off your pictures, Search, so people can search through your posts to find exactly what they want, or Twitter, which puts your most recent tweets on your blog. Where these widgets are located are template-dependent; some templates may have them on the Sidebar (left or right), some may have them in the footer area.
On the left navigation hover over and click the arrow on “Appearance,” then click “Widgets.” A disturbing number of pre-programmed widgets pop up for you to add. As you will notice, there are two columns on this page: on the left, it shows the “Available Widgets” and the right are the different areas [footnote]there may be just one depending on your template[/footnote] that you can add widgets. Drag the rss feed widget to the sidebar, find an rss feed such as teh one referenced below, and provide whatever additional information that you think that appropriate such as title, date, etc. You have added your first Widget. When you preview your site the rss feed should appear as well. BTW, if you are confused about RSS feeds, the one below loads articles from the New York Times Personal Tech section and you are welcome to use it.
http://rss.nytimes.com/services/xml/rss/nyt/PersonalTech.xml
Uploading Photos to Your Posts
Time to learn how to upload photos to a post.
1. Locate an image that you would like to use.
2. Start a new post and type something that relates to the picture that you chose. Make sure you include a title and some generic content for the post. Once you’re done, make sure the cursor in the text box is exactly where you want the image to appear; this is important, because wherever the cursor is, the image will appear on that same line. [footnote] either left, right, or center justified. [/footnote]
3. Above the text editor, you’ll see the add media tag shown below. ![]() Click Add Media and, in this case, click on upload files. Take note, however, that you do have other options including “Insert from URL,” [footnote] If your file is coming from a web address instead of from your computer.[/footnote] Set Featured Image [footnote] Featured images are used in special cases and their use may vary depending on your theme [/footnote], Create Gallery [footnote] Create Gallery is used when you want to show of LOTS of images with the default WordPress Gallery, which is actually pretty good. [/footnote], and Media Library [footnote] the Media Library option gives access to all of the media that you have already uploaded. [/footnote]
Click Add Media and, in this case, click on upload files. Take note, however, that you do have other options including “Insert from URL,” [footnote] If your file is coming from a web address instead of from your computer.[/footnote] Set Featured Image [footnote] Featured images are used in special cases and their use may vary depending on your theme [/footnote], Create Gallery [footnote] Create Gallery is used when you want to show of LOTS of images with the default WordPress Gallery, which is actually pretty good. [/footnote], and Media Library [footnote] the Media Library option gives access to all of the media that you have already uploaded. [/footnote]
A box pops up that prompts you to Select Files, but you can drag files to this window or click Select Files and browse to wherever your photo is on your computer. Now you have the options to change the Title, Alternative Text, Caption, Description, Alignment, and Size. Here’s a quick description of each of those:
Title: Basic and simple – the Title
Alternative Text: This is the text that appears in the yellowish colored box when you hover over the image. This can also be the Title of the image.
Caption: This is the text that may/may not appear under the images [footnote] It depends on the template you have chosen whether or not the caption shows [/footnote]
Description: This is a longer description of the photo; used mainly for when someone uploads a lot of photos and needs to remember exactly which photo was which
Alignment: This is where the image will show up on your post: Left, Center, or Right
Size: This is how large you want your image to show up. One good generic size will be Medium, but feel free to try the others.
Go ahead and set the parameters however you would like, and click Insert Into Post at the bottom of the screen. If it appears in the wrong place, do not worry. You can either drag it to where you want it, or hover over the image and click the delete button. Once you’re done, make sure the cursor in the text box is where you would like your image to appear and try it again.
Pages v. Posts . . . What’s the difference?
Take a look at the left navigation. You’ll notice that there are buttons for both Posts and Pages, so what is the difference? Take a look at what WordPress says about it:
Posts are listed in reverse chronological order on the blog home page or on the posts page if you have set one in Settings > Reading.
Pages are static and are not listed by date. Pages are more for static content, stuff that doesn’t change on a regular basis. Posts are timestamped and act like a blog.
Let’s go ahead and make a page that is has some basic information about yourself.
Adding a Page
1. At this point you have a home page that accepts posts and an “About” page. Hover over the “Pages” icon and click the arrow on the right to drop down the menu.
2. Click on the “Add New” button that pops up underneath. As you can see, this looks almost identical to a Post page minus a few of the extras. Go ahead and title this page “About Me”, and add some content to the box. Feel free to mess around with the formatting some and throw a picture of yourself in there as well. [footnote]same steps as how we did it for the Posts.[/footnote]
3. Go ahead and push “Publish” on the right navigation.
4. View your page. If you have the published version of your site open in another tab, go there hit refresh, and click the About Me tab. Otherwise, click “View Page.”
5. You should see the Home and About Me tabs in your page’s header. Be aware that other templates may display links to pages in the sidebar, while others do not even show them unless you add the pages widget.
Permalinks: Changing the URL of your pages
By default, WordPress pages display with URLs such as wordpress/?page_id=5. There are other options however via a feature known as permalinks. The permalinks feature can be accessed via settings but it’s even easier to click the “change permalinks” button while you are editing a page (just below the title box).
This button links to several options for changing the URL of your pages. The most straightforward, post-name, changes a URL for a page named contact from something like wordpress/?page_id=5, to a more representative wordpress/contact/ .
Managing comments
Although WordPress is a great content management system, it started as a blogging system and blogging features, such as default enabling of comments on pages, are deeply embedded in its DNA. Although comments can be great for a blog, you may not want random strangers to be able to comment about every page or post on your website. In particular, you certainly don’t want to be bombarded with thousands of random bot-generated comments [footnote] otherwise known as spam.[/footnote]
You have at least two good options for dealing with this problem. By default, WordPress installs with a spambot killer called Akismet. Once you activate Akismet, which involves signing up for a Key, bot generated spam is drastically reduced but genuine human beings can still comment on your pages and/or posts.
If you prefer to eliminate the comment option completely, follow this procedure.

1. Check the pages or posts that you want to de-comment.
2. Click the “bulk actions” button [footnote]![]() [/footnote] and select edit.
[/footnote] and select edit.
3. Click apply and set comments to do not allow [footnote]![]() [/footnote]
[/footnote]
4. Click Update and the comment boxes on those pages and posts will disappear.