As we mentioned earlier, being able to switch themes is a powerful and easy way to provide a completely new look to your WordPress website. But what if you like the overall look and feel of a particular theme but want some subtle changes, such as more width on specific pages or maybe you want to get rid of the right sidebar? In that case it may be time to tinker with your CSS settings and the special templates that make up a given theme. Let’s explore this idea.
1. To begin, visit free.mynmi.net and dowload azul.zip, if possible without unzipping it. [footnote]Downloading without unzipping is easy. Right-click on the file that you want to download, choose “Download Linked File As”, and save the zip file somewhere on your computer. [/footnote]
2. Click appearance, then “install themes, and afterward click upload. Upload and activate azul.zip.
If, at any point you are prompted to update the azul theme, do not do so. You need this particular version and none other.

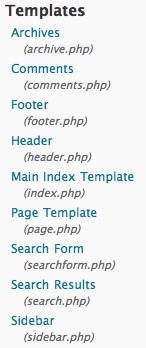
3. Click on Appearance and then Editor. This step should automatically open a file called style.css that contains all of the styles for this particular theme. In addition to style.css, on the right side you will see a long list of template files that can also be edited. [footnote] A partial list is shown below [/footnote].
The CSS file and the template files work together to form much of the structure, functionality, and look of your site. For now, we are going to concentrate on two of those files: page.php and styles.css.
FTP to your theme’s folder
4. FTP into your site and find your way to the wordpress folder that contains your WordPress installation. From there, locate the wp-content folder and click your way through to the themes folder and, finally, into the azul folder. The azul folder contains everything for this particular theme.

Create copies of templates and files
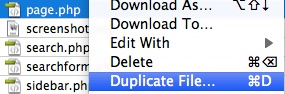
5. Duplicate files. Right-click on page.php and choose duplicate file. Name the new file new-page.php. Duplicate style.css as well and name it new-style.css.
6. Download the folder called images onto your computer; it doesn’t mater where, as long as you know where to find it. You will be working with the images in this folder later on.
Why are we doing this?
The reason that we are duplicating files and downloading a folder of images is because we are going to modify the files and use the images that we downloaded to create a brand new page template that is slightly different from the page template that came with this theme.
Because the original page template is made up of a collection of php files, CSS styles, and images, we can’t modify the original files and styles without changing the original template. Therefore we have to create new, duplicate, versions of all files and styles that make up the template that we can hack without affecting the original page template.
7. Return to your browser. Return to WordPress’s editor if you are not still there and hit your browser’s refresh button. Look again at the list of files on the right side. You should see the two new files that you just created: new-style.css and new-page.php.

Switch CSS files/ Create an alternative template
8. Open new-page.php with the editor. You should be looking at a bunch of code. Find your way down to the (seventh) line of code that reads:
<link rel="stylesheet" href="<?php bloginfo('stylesheet_url'); ?>" type="text/css" media="screen" />
FYI, this line of code instructs the php file to load style.css. Delete this line of code and replace it with this one:
<link rel="stylesheet" href="<?php bloginfo('template_url'); ?>/new-style.css" type="text/css" media="screen" />
You can copy that code from: free.mynmi.net/copycode.html
Click the Update File Button
You have just instructed new-page.php to use new-style.css instead of style.css. The reason you switched to a different stylesheet is because you want to edit the styles for new-page.php without affecting the appearance of the other templates. To accomplish this goal you are switching to a different stylesheet.
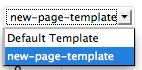
9. While new-page.php is still open you need to implement one more step so that WordPress will know that it is a template file. At the very top of the page, enter in the lines of code shown below (just above the line that begins with <!DOCTYPE html). This code can also be copied at free.mynmi.net/copycode.html
<?php/*
 Template Name: new-page-template
 */
 ?>
Hack the New Template
10. Delete the Sidebar. Scroll to the bottom of new-page.php and find the code shown below. Those three php commands are standard in many WordPress themes. What they do is instruct the template to load three additional documents. The sidebar, the standard footer, and a WordPress footer. [footnote] Oddly enough, this particular theme does not actually include a WordPress footer even though it has documents that ask for one. [/footnote]

a) If you look at the preview version of your document you can see the Header that includes the title and the footer that says “Powered by WordPress | Designed by Switchroyale 2009.”
b) For now, lets lose the sidebar by deleting the line that says
<?php get_sidebar(); ?>.
Click the Update File button.
11. Just for fun, open the footer.php file, delete everything between the <p> and </p> tags and replace it with your own words. Add a url and/or a thumbnail-sized picture if you feel ambitious [footnote] and know how [/footnote]
Apply the new Template
12. Return to the Pages menu and edit the about page. On the right side you should now see the Template selector. Choose new-page-template.
13. Add (paste in anything) 4 or 5 lines of text to your about page.
14. Go to your preview tab and check out the new about page. It should no longer have a sidebar and whatever you put into the footer should appear at the bottom.
Expanding the width of the new template
15. Changing Page Width: Next let’s expand the width of this template.
(a) Return to the edit menu and open new-page.php again. Scroll down to the <body> and notice the line of code just below that says <div id=”container”>. As you may know, what this code is telling us is that this particular div tag is defined by a CSS id tag called container. As the id title suggests, this div tag “contains” the entire document. To modify the width of this div tag we need to open the CSS file that contains the container id tag that defines it.
#container {
    width: 960px;
background: url(images/containerbg.jpg);
background-repeat: repeat-y;
(b) Open new-style.css (should be located at bottom right). You should be able to see the code shown at right that sets the div tag’s width to 960. Change it’s width to 1160. Click Update and go to your preview bar to see if anything looks different. Chances are, not much has changed except that the Search field is way over to the right. [footnote] The reason that everything else looks the same is because background images are actually defining the look of your page.[/footnote] The Search field is actually aligned against the right margin of the container div tag; you just can’t see the div tag.
(c) Open new-style.css again and look, once again at the #container style. Container, as you can see, uses a background image called containerbg.jpg [footnote] from the images folder [/footnote] that repeats the Y value; in other words it repeats itself (tiles) vertically. Just below #container is the #header style that has a background image called headerbg.jpg. If you scroll through the document and look carefully you should eventually be able to find that the #navbar and the #footer styles (surprise) use navbarbg.jpg and footerbg.jpg for their respective backgrounds. Time to modify all of those images.
(d) Find the images folder that you downloaded to your computer a while back. Using Fireworks, Photoshop or some other image editor, open containerbg.jpg, headerbg.jpg, navbarbg.jpg, and footerbg.jpg.
(e) These 4 images all have the same width of 960 pixels. If you are using Fireworks, Modify- Canvas- Image Size deselect “Constrain proportions” [footnote]![]() [/footnote] and change the width of each image to 1160 pixels.
[/footnote] and change the width of each image to 1160 pixels.
![]()
Be sure that the height does not change from 50, 150, or whatever it was to begin with.
(f) For each image, “save as” and add new- to their original names as in: “new-navbar.jpg”. Be sure they end up in the images folder so that you can find them!
(g) Upload the new images into the Azul theme’s images folder.
(h) Return to the WordPress editor. Find the #container, #header, #navbar, and #footer styles and target the new background images that you just uploaded as in:
background: url(images/new-containerbg.jpg), background: url(images/new-navbarbg.jpg); etc.
(i) After you have modified all four styles click the Update File button.
(j) Go to your preview tab and check it out. If everything is working as it should, the page should be significantly wider but there are still a couple of issues:
1) for some reason the “home” button is sticking out a bit too far to the left.
2) the text breaks way too early so that the right side of the page is blank.
(k) Let’s fix the Home button first. Return to the WordPress editor and open new-style.css. Scroll down till you find the #navbar ul tag shown below and change 30px to 50 px. This will push the Home button far enough to the right to resolve the sticking out issue. [footnote] If you figure out what caused the sticking out problem please tell me because I want to know. [/footnote]
#navbar ul {
        margin: 0 0 0 30px;
        padding: 0;
}
(i) Now the Text issue. Scroll down a few lines and you will find the #posts style shown below, that controls the location and size of any text entries that you make on a page. Currently the width of our container is set to 1160 but the width of the post style is only 600. After we take into account that the left side padding of the post style is 50 pixels and the right margin is 20 pixels, that leaves us with a potential text space of 1090. So let’s use it. Change the width of #post to 1060 which will also give us some additional space on the right side.
#posts {
       width: 600px;
       padding: 0 0 0 50px;
       margin: 0 0 20px 0;
       float: left;
}
(m) Click the Update File button, go to your preview tab and check it out. If everything looks right, you are done! Any pages that you make in the future can use either the default pages template or the new one that you just created.
16. Let’s make one last change to totally divorce ourselves from the idea that WordPress has to be a blogging platform. By default the home page displays a list of posts; ie. a blog. De-blogging is actually quite easy.
(a) Click on Settings and then on Reading.
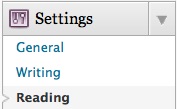
(b) Change your Front Page to Static Page as shown below and select the static page that you want to replace the posts page.

(c) Do not select a posts page.