In this lesson you will create 3 separate web pages that showcase pictures from a trip to Costa Rica and learn a lot about using div tags in conjunction with CSS to position content. When you are finished you will link the three files together into sort of a mini website. Let’s get started.
- Download div_layout.zip from http://free.mynmi.net. Unzip it and drag the div_layout folder into your mysite folder.
- Create a new web page and save it inside the div_layout folder as monkeys.html.
- Find the rollovers.css file that you created in the previous lesson. Copy and paste it into the div_layout folder.
- Create a new CSS file named div_layout.css and save it into the div_layout folder.
- Attach div_layout.css and rollovers.css to monkeys.html (below the <title> tags).
<link href="div_layout.css" rel="stylesheet" type="text/css">
<link href="rollovers.css" rel="stylesheet" type="text/css">
- Create a new style called #all_content inside of div_layout.css. This style, as its name suggests, will define the div tag that contains all of your content.
- Be sure and add the # sign to the style name. The purpose of adding # to the style name is to create an id style to be used only one time per document.
- Add the following characteristics to #all_content (remember the semicolons):
- width:1000px; height: 2200px;
- margin-left: auto; margin-right: auto;
- background-image: url(“pix/bkg.gif”); position:relative;
- Now that you have made this style it is time to apply it to a div tag and find out what it does. Immediately after the <body> tag enter <div id=”all_content”></div>.
- The part that says <div id=”all_content”> is the starting point for the div tag
- </div> is the ending point of the div tag.
- Preview your document. If everything worked properly you should have a totally new two-columned look in the middle of your page. FYI, the “columns” are actually made up of a tiled image called bkg.gif that you set as the background image in a previous step. Later you may want to change the look of background by opening bkg.gif in fireworks or photoshop to change its colors. Or you could simply delete (or ignore) bkg.gif and use CSS to set background colors for each of the div tags that you are about to create.
- You are about to insert a series of div tags inside of the all_content div tag. This process can be confusing when you do it for the first time. In order to make it less confusing we are going to insert a ‘comment’ immediately after the tag that closes the all_content div tag: </div>. Comments are invisible to the browser but can be a very useful feature for web developers. When you finish, your code should look something like:
<div id="all_content"> </div><!--all_content ends here--> - Now create a new ID style in div_layout.css, just as you did with #all_content named #banner. Set your background color to whatever you like, height to 92 pixels, width to 100%, and margin-top to auto (click the positioning tab to find Top).
- Insert a new div tag between <div id=”all_content”> and </div> and apply the banner style to the new div tag. Your source code should look more or less like this:
<div id="all_content"> <div id="banner"></div> </div><!--all_content ends here--> - Preview in your browser. The banner should appear at top of your page.
- Create another new ID called #leftlinks with a width of 150px, height of 2100px and Float it to the left. (float: left;)
- Insert a div tag after the banner and attach leftlinks to it <div id=”leftlinks”></div> .
- Create an ID style called #right_side_content. Set the width to 850px, height to 2100px, and float it left as well.
- Insert a div tag to after the leftlinks div tag and attach right_side_content to it.
<div id=”right_side_content”></div>
- Insert a div tag to after the leftlinks div tag and attach right_side_content to it.
- Type a title into your banner. Now return to your css file and put in some initial text values for your banner such as font-size, font color ( color: #000000; for example). Also add a font family ( enter font-family: and brackets should prompt you with some choices). Once you apply the changes, the look of the text within your banner should change. If you don’t like it, modify the #banner rule until you are content. While you are at it set the display to block (display:block;) and experiment with the letter spacing ( letter-spacing: 6px; for example), vertical alignment (enter vertical-align: and look for prompts) and any other values that you want to play with. For inspiration, you may want to visit w3school’s font information page: http://www.w3schools.com/cssref/pr_font_font.asp
- Create a Css tag named body and set a background color. This should change the background for the entire page!
- Take a look at your page does everything appear to be in it’s proper place? If not, fix it. Otherwise, move on.
Adding and Positioning Content
An important trick for moving quickly in web development is to re-purpose work that already exists. You just invested time developing monkeys.html so let’s leverage that investment by using monkeys.html to create the two additional webpages that we will need for this exercise. Once all three webpages exist, we will develop them further.
- Save monkey.html again, but this time save as and create a brand new file called birds_and_bananas.html. Save as again and create another file named waterfalls.html. At this point you should have 3 identical files open, but with separate names for each. Your next task is to add content to each of those files.
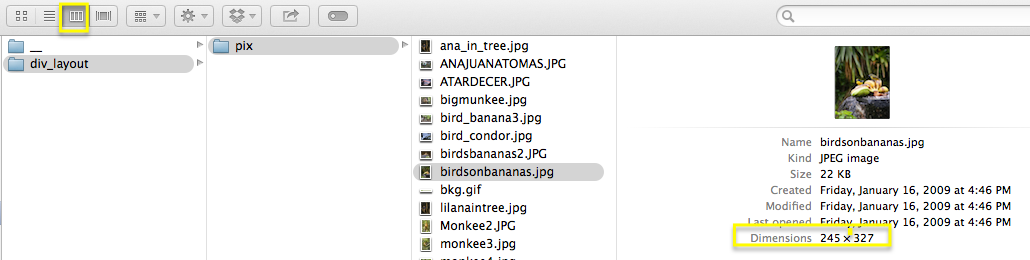
- Let’s start with birdsandbananas.html. We are going to start by inserting an image named birdsonbananas.jpg (inside of the pix folder) inside of the right_side_content div tag. Before we do that, however, we also want to create a special div tag that is tailored just for the birdsonbananas.jpg image. So we need to know the size of that image.
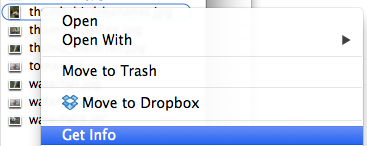
- There are several ways to get the dimensions of an image. The screen capture below shows one that works well with the Macintosh OS by viewing folders and files with the ‘columns’ view. As you can see, the image named birdsonbananas.jpg has a 245px width and a 327px height. Another easy way to find the dimensions of an image is simply to right-click on it and select “Get Info” from the drop down list that appears. Of course, it is also possible to open the image in an image editor such as preview, fireworks, or photoshop and find the dimensions there.
- However you determine dimensions, once you have them create a new class inside of div_layout.css named .bb1 with width:245px; and height:357px; and float:left; as shown below: [footnote] Just so that you will know: do not start the name of the CSS tag with a number. You can use a number in the name but a number can’t be the first character unless you want web browsers to hate you![/footnote]
.bb1 {width:245px; height:357px; float:left; }You may have noticed that the height of the css rule, .bb1, is greater than the height of the image. That’s because we want to leave a bit of room inside of the div for descriptive text.
- Now insert a div inside of right_side_content, apply your new .bb1 rule to it, and insert birdsonbananas.jpg into the new div as shown below.
<div class="bb1"><img src="pix/birdsonbananas.jpg" alt="birds on bananas"/> </div>
- Notice that <img src, in addition to a path to birdsonbananas.jpg, also has an alt tag that describes the image. The alt tag is optional but falls into the category of ‘best practice’ for two reasons:
- Users who are visually impaired sometimes rely on tools that read alt text out load to them.
- If, for some reason, your image does not load, the alt text at least provides a description of the missing image.
- Preview your page. You should see your image but at this point the div tag is invisible. To provide a visual aid that allows you to actually look at your div tag, return to the css file and add border: 1px solid #1394ce; to .bb1 in order to provide a 1 pixel solid blue border. If, for some reason, you want a thicker border, simply increase 1 to something larger. Be aware as well, that you can add other characteristics to borders such as border-color, border-radius (mainly used for creating ovals), and border-style [footnote]In case you want something other than solid[/footnote]
- Before we move on, let’s set the left margin of .bb1 in order to move your picture to the right a bit by adding margin-left: 5px; You may also want to think about a top margin margin-top: 5px; (for example) to push it further down the page. [footnote]If you want a margin around all 4 sides of a div tag, simply put in a value for margin as in margin:5px; [/footnote]
- Add some descriptive text above or below the picture. If you need additional room for text, expand the size of the div tag by adding more height to the CSS rule that defines it.
- Repeat the same steps that you used with the previous image for a brand new one. If you get lucky and find an image that is the same size as another image that you already added, you can apply a pre-existing class to it.
- Add a few more bird and/or banana images, following the same steps.
- Save the file.
- Open monkeys.html. Insert the four monkey pictures, following the same steps (div tags, css, etc.) that you did with birds_and_bananas.html. Please keep in mind that you can re-use CSS classes so at some point you may have one that is already the right size and can use it for an image instead of creating a new rule.
- Open waterfall.html and do the same thing.
- Starting with waterfall.html, create links inside of the leftlinks div tag to the monkeys.html, birds_and_bananas.html. While you are at it, create an unordered list (ie. bullets, as shown below).
<div id="leftlinks"> <ul> <li><a href="monkeys.html">Monkeys</a> <li><a href="birds_and_bananas.html">Birds and Bananas</a> </ul> </div> - Save waterfall.html and test the links. If they work properly, link the remaining two files to each other and to waterfall.html as well. Test thoroughly. If you have done everything right, you should have a fully functioning website of 3 pages that all connect to each other. If not, ask your instructor for help.