A major goal of ours at the NMI is to equip our students with skills that will give them an edge in the job market, and some of our industry connections have specifically asked for students who know how to use Drupal. Hence, this lesson.
Drupal, like WordPress, is a content management system that stores all of it’s data in a mysql database. Drupal is also similar to WordPress in other respects. Pages and posts are created online from a browser window, themes control the look and feel of your site, and plugins (known as modules) for extending functionality are available, although are far fewer of them.
Rumor also has it that Drupal is both more powerful and more complex than WordPress. Let’s get started and find out for ourselves.
Installation
Installing Drupal is a breeze if your hosting account’s Cpanel provides one click installation. If you are a typical NMI student with a Godaddy hosting account, your Cpanel does indeed have that option.
- Login to your Cpanel and look for Drupal in the Web Applications section

- Click the silly blue icon, and then click the Install this application button.
 At this point, the installation process is almost identical to the WordPress install that you did earlier. Fill out the Directory field to create a path to your installation. If you want the path to be something like http://williamwatson.com/drupal, simply enter drupal into the field.
 -
 Enter a user name, password, and email address into the settings section. You may also want to enter a website title in this section, although you can save this step for later if you want.
 - Click the install button and wait until the processing is complete.
- Now visit your new drupal site and login with the Administrator username and password that you just set up.
Create Content
Time to start Drupaling. The good news is that much of what you have already know about WordPress will help you to make sense of Drupal as well. With Drupal for example, you create content via Pages and Articles which function the same way as Pages and Posts do with WordPress.
If you have logged in successfully, you should see something similar to the screen capture below. As you can see, this latest site was created one minute and 36 seconds before I just logged in!

- To add content (surprise), click the content tab and then (double surprise) the add content button. At this point, you have to decide which type of content to create. Content created as an article, just like a post in WordPress, appears on the posts page, while content created as a page functions like a separate webpage.
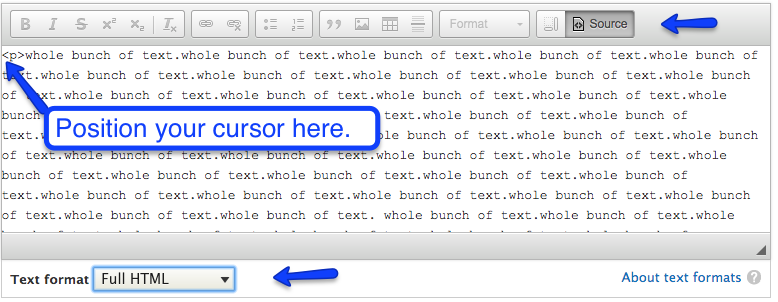
- Let’s start with a page by clicking the “Basic Page” tab. Give your page a title such as About and type or paste in a whole bunch of text. As in several hundred words of text.
- Now that we have text, let’s add an image. You COULD upload an image but let’s take another approach just to illustrate one of the differences between Drupal and WordPress. Click the source tab at the top of your editing window and then select Full Html as your text format (as shown below). Now paste in the following code:
<img src="http://emuel.mynmi.net/st.jpg" align="right" alt="San Cristobal De las Casas">
- Click the source tab again to return to the wysiwyg mode, and should see a nice picture from San Cristobal Mexico that is aligned to the right side of your window. Note that we added the align=”right” formatting option via html. If we had uploaded an image instead, the option would have been provided for us. Something else about Drupal that is different (and less useful) than with WordPress, is that it does not provide a default option for inserting previously uploaded images into a page.
-

Now that we have a page it is time to publish it. Before we do, however, let’s explore some of the options for the page.
Menu Link and Title. If you want the page to appear in a menu, you have to check Provide a menu link, as shown at right.The menu link title defaults to the page’s name unless you tell it otherwise.
Parent Item defaults to Main Navigation, but it is also possible to set the parent item to another page in order to produce a drop down menu.
The weight option does just what it says. In a website with multiple pages, the page with the lowest number (weight) appears first in the menu.
Authoring information should be obvious.
Promoted to front page will (no surprise) put your content on the front page of the site.
Sticky at top of lists will ensure that your content will appear at the top of any list of content (or something like that 🙂