Google Forms, one of Google’s many free [footnote] with advertising of course 🙂 [/footnote] gifts to the world, makes building a form that saves users’ responses into a database ridiculously easy. Here’s how it works.
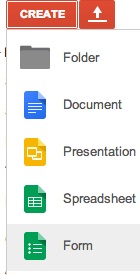
1. Log into your Google (or gmail) account and find your way to Google Drive. Click the Create button and select Form.
2. Suddenly you are in a new browser window with lots of options. First, give your form a name and select a theme.
3. Give your first question a title of “Name”, choose text for your question type, make it a required question, and click the done button.
4. Add another text question (from Add Item) titled “Your Email Address”, make it required and click the done button.
5. Add a paragraph text item, title it comments and click Done.
6. Now try your hand at creating a multiple choice question.
7. Once you finish with the multiple choice question, experiment with at least one of the other options. By all means do as many as you like! [footnote] BTW, you may want to try out one of the many custom themes.[/footnote]
- Explore the ‘add-ons’ options. You don’t have to use an add-on but it’s good to know that they are there because you may find one that is useful.
- Click Responses, Choose Response Destination, and make sure that your responses will be saved in a spreadsheet.
8. The form should save automatically as you create. At this point you have a Google form with a unique URL that you could create a link to on your website but why not make it PART of your website?
9. Embed your form. Somewhere on your form page there is a path that leads to the option to embed your form. I no longer give specific instructions about this path because it changes too often. So click around and find it! Once you get to the right place, a window should appear with a bunch of text that begins with <iframe src= .
10. Based on whatever Google’s latest iteration of this process is at the time that you encounter these instructions, you may have the opportunity to change either the width of the height of your embed window. Chances are good, that the default option is too short so you probably should aim for more vertical space if that is an option. There may also be a “copy” button. If not, copy the iframe text (Command C) to get it onto the clipboard and return to your form.
11. Create a new html page and paste the embed code between the <body> and </body> tags.
12. If you did everything right the source should look something like this:

Notice the width and height tags. Even though you may have modified them when you copied the code, you can always modify them again to suit your formatting requirements.
13. Save your page as googleform.html, test it in your browser, fill it out, and submit it.
14. Now return to the google documents page. You should be able to see the output from the form at the top of the page. Open it and look.
15. While you have the form open click on the Form tab [footnote] just below the title of the form [/footnote] and select “Edit Form”.

Once again you should be in the editing portion of your form. Make a change and save it. Return to the page that contains the form and refresh it in your browser. See the change? You should.